The best low-slope roof isn’t chosen by material name alone. The right low slope roofing options for homes depend on the roof’s design, how water drains, and how the system is planned for the Pacific Northwest’s persistent moisture. Even a roof that appears flat needs a clear path for water to reach drains or other outlets.
If you’re planning a replacement or installation, it’s reasonable to wonder what terms like TPO, EPDM, and modified bitumen mean, and how a low-slope roof is designed to shed rain. This guide compares common system categories and explains the practical factors that shape a good choice, from roof pitch and drainage to seams and flashing. You’ll have a clearer framework for understanding your home’s needs and discussing a system suited to its design.
Key Takeaways
- Roof shape, drainage routes, and outlet placement help determine which system fits a low-slope roof.
- Compare low slope roofing options for homes by learning how EPDM, TPO, and PVC membrane systems differ.
- Plan a replacement or installation around the roof design, compatible materials, and careful project sequencing.
- A final inspection provides an opportunity to review the new roofing system and its details.
What Makes a Roof Low-Slope, and Why Does the Design Matter?
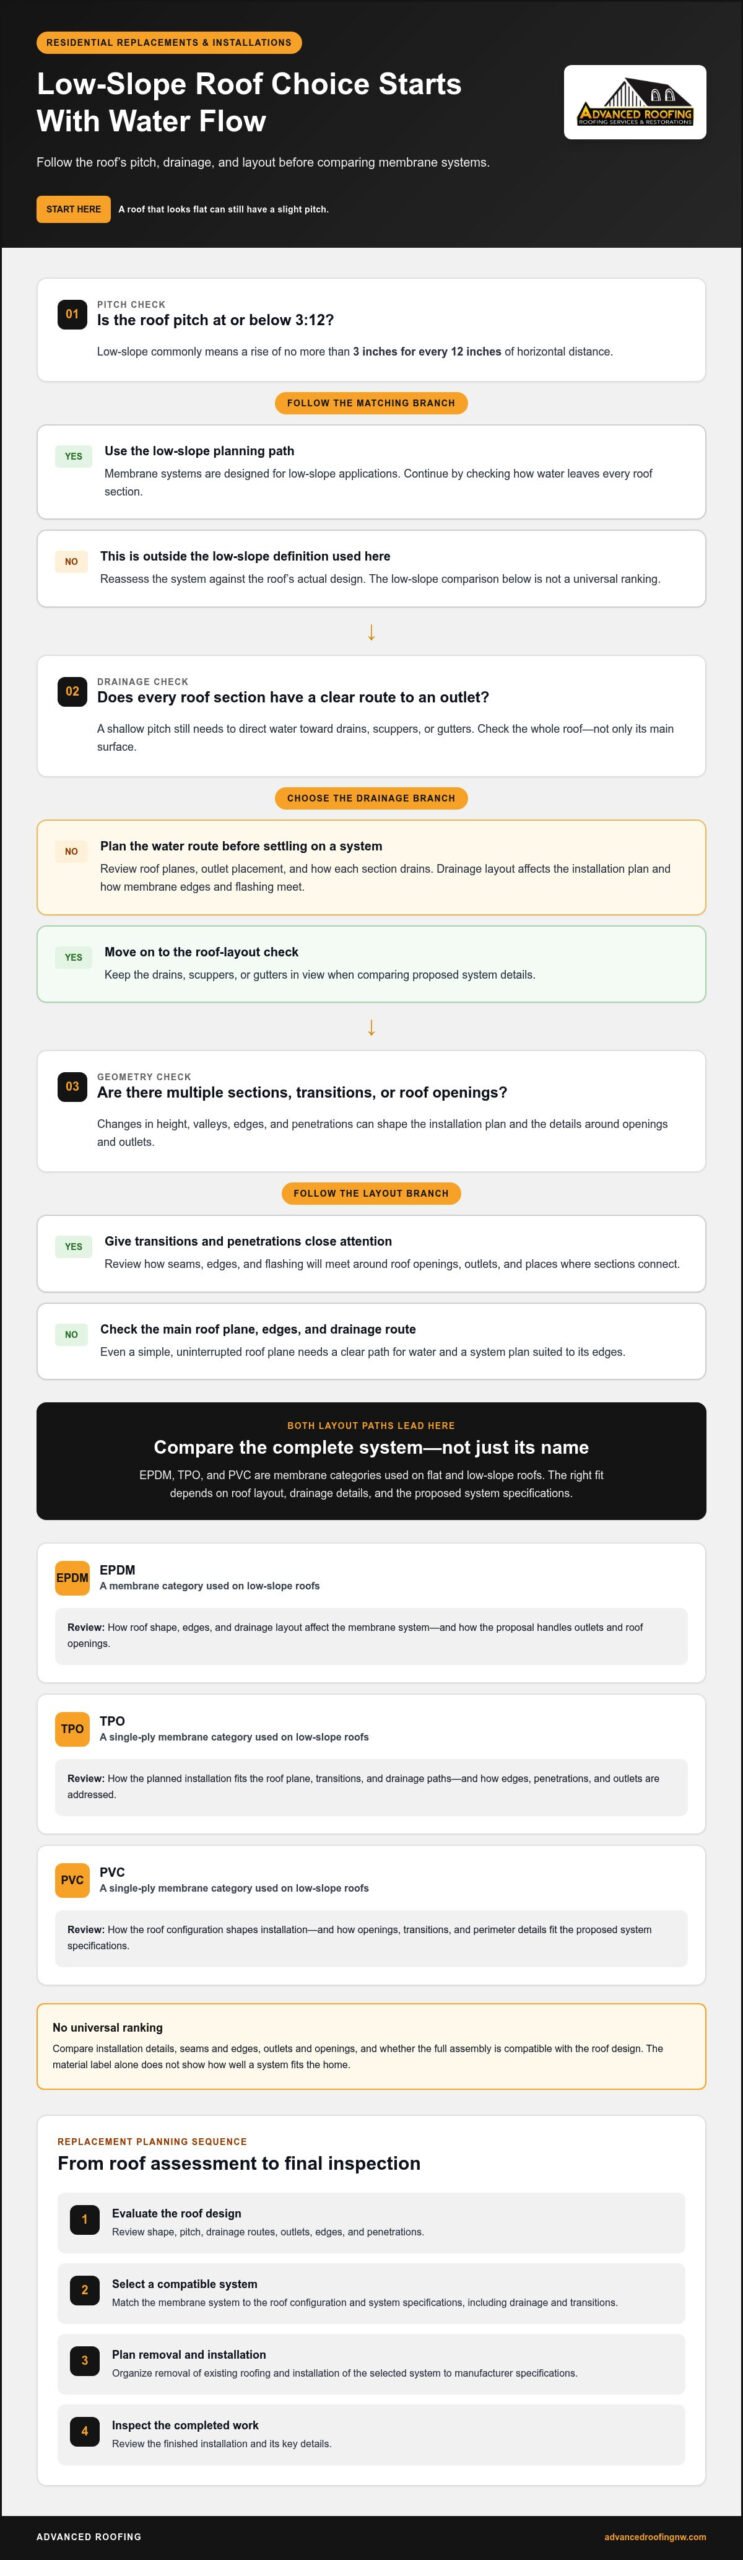
A roof can look flat from the ground and still have a slight pitch. In roofing, “low-slope” commonly describes a roof with a pitch at or below 3:12, meaning it rises no more than three inches for every 12 inches of horizontal distance. That gradual pitch helps direct water toward drains or outlets rather than letting it collect across the surface.
The distinction matters because roofing materials must suit the way the roof moves water. Traditional shingles, for example, aren’t suited to slopes below 2:12, where water can work beneath them. Membrane systems are designed for low-slope applications, but the right fit still depends on the roof’s shape and intended use. For a broader overview, see this low-slope roof definition and materials.
How drainage and roof geometry shape a low-slope system
Even a shallow pitch needs a clear drainage path. The roof’s planes, transitions, valleys, and edges direct rain toward drains, scuppers, or gutters. Their location and layout affect the installation plan, including how membrane edges and flashing meet around openings and at the roof perimeter.
Drainage planning should account for the whole roof, not just its main surface. A home with several roof sections or changes in height has different planning needs from one with a simple, uninterrupted roof plane. Check that the proposed layout gives water a route off each section and consider how outlets work with the roof’s shape. These details are especially important where roof sections meet or where penetrations interrupt the surface.
That’s why low slope roofing options for homes aren’t interchangeable by name alone. For a replacement or installation, Advanced Roofing considers the roof design and intended application when planning a suitable system for the home.
Which Low-Slope Roofing Options Could Suit a Home?
EPDM, TPO, and PVC are membrane roofing categories used on flat and low-slope roofs. Each may suit a residential project, but the right choice depends on the roof’s layout, drainage details, and the specifications of the proposed system. A material name alone doesn’t tell you how well the complete roof assembly will fit the home.
| System | Potential application fit | Roof-design considerations | Project-specific evaluation |
|---|---|---|---|
| EPDM | A membrane category used on low-slope roofs. | Consider how the roof’s shape, edges, and drainage layout affect the membrane system. | Review the proposed system specifications and how details around outlets and roof openings will be handled. |
| TPO | A single-ply membrane category used on low-slope roofs. | Assess how the planned installation fits the roof plane, transitions, and drainage paths. | Compare system specifications and how the design accommodates edges, penetrations, and outlets. |
| PVC | A single-ply membrane category used on low-slope roofs. | Consider how the roof configuration and drainage details shape the installation plan. | Evaluate the system specifications alongside the roof’s openings, transitions, and perimeter details. |
How to compare membrane systems for a residential roof
No single low-slope roofing material suits every home, because roof configuration and system specifications both matter. For example, a roof with several sections and openings calls for attention to transitions and penetrations as well as the main roof surface. Ask how the proposed system fits the roof’s layout, how its details will be installed, and whether the full assembly is compatible with the design. Advanced Roofing can assess these project details and plan a system suited to the home.
To explore low-slope roof replacement planning, consider how each option fits the roof’s overall design, not just its material label.
How to Plan a Low-Slope Roof Replacement in the Pacific Northwest
A successful replacement starts with the roof itself, not a material label. In the Pacific Northwest, persistent rain and damp conditions make drainage planning an important part of selecting and installing a low-slope system. Advanced Roofing provides residential roof replacements and new construction roofing, including flat roof systems, with planning shaped around each home’s design.
What homeowners can expect from replacement planning
Advanced Roofing’s replacement process moves from evaluation through planning, removal of existing materials, installation, and a final inspection. This sequence connects the system choice to the home’s configuration and the details needed for the new roof.
- Evaluate the roof design. Review its shape, pitch, drainage routes, outlets, edges, and penetrations. These details help guide system suitability and installation planning.
- Select a compatible system. Match the membrane system to the roof’s configuration and the system specifications. Consider how the planned assembly will handle drainage and transitions.
- Plan removal and installation. Organize removal of the existing roofing and installation of the selected system. Advanced Roofing installs to manufacturer specifications, with attention to the details that support the roof’s intended performance.
- Inspect the completed work. A final inspection provides an opportunity to review the finished installation and its key details.
This practical sequence makes the choice among low slope roofing options for homes easier to work through: assess the roof, match the system to its design, then plan the work around drainage and installation details. Homeowners can also consult Advanced Roofing’s Vancouver roof replacement guide and new roof cost guide while preparing for a project. Advanced Roofing serves homeowners in Greater Portland and Vancouver, including Vancouver, Battle Ground, Camas, Ridgefield, La Center, Longview, Kelso, Woodland, Castle Rock, and Kalama.
Take the Next Step Toward a Roof That Fits
Choosing among low slope roofing options for homes is an opportunity to plan around your home’s specific design, rather than selecting a material by name alone. A thoughtful replacement starts with understanding the roof’s layout and how the new system will work with it. That clear project picture makes it easier to compare options and plan the work.
Advanced Roofing is family-owned and operated, serving the community since 1997, and fully licensed, bonded, and insured in Oregon and Washington. For a replacement, request Free Roof Replacement Estimates. You can discuss the roof’s design and consider a system suited to the home, with local knowledge of Pacific Northwest roofing conditions informing the planning. Contact Advanced Roofing to take the next step toward a replacement or installation that fits your roof.
Frequently Asked Questions
Can asphalt shingles be installed on a low-slope roof?
Sometimes, but suitability depends on the roof’s actual slope and the applicable manufacturer’s installation specifications. Don’t assume a standard shingle system is appropriate. For example, a small porch roof connected to a home may have a different slope from the main roof. A project-specific evaluation helps match the roofing system to the home’s design.
How often should a low-slope roof be inspected?
A low-slope roof should be inspected every 1 to 2 years or after major storms. An inspection can assess roofing materials, flashing, valleys, drainage, fasteners, sealants, ventilation, moisture intrusion, moss or algae, and structural concerns. For homeowners in Vancouver, Battle Ground, Camas, Ridgefield, La Center, Longview, Kelso, Woodland, Castle Rock, and Kalama, this review can help inform future replacement or installation planning.
Is a low-slope roof suitable for a home addition?
Yes, a low-slope roof may suit a home addition, depending on its design, drainage plan, and compatible roofing system. Consider where the new roof meets the existing structure, including changes in height and roof edges. Exterior improvement and restoration professionals like Royalty Construction emphasize that tying an addition into the existing structure requires careful integration of flashing, drainage, and building envelope details. Planning should establish how rain will move toward an outlet. Low slope roofing options for homes depend on these connected design details, not a one-size-fits-all choice.